Thursday, April 4, 2013

25 Things To Do Before You Turn 25


1. Make peace with your parents. Whether you finally recognize that they actually have your best interests in mind or you forgive them for being flawed human beings, you can’t happily enter adulthood with that familial brand of resentment.
2. Kiss someone you think is out of your league; kiss models and med students and entrepreneurs with part-time lives in Dubai and don’t worry about if they’re going to call you afterward.
3. Minimize your passivity.
4. Work a service job to gain some understanding of how tipping works, how to keep your cool around assholes, how a few kind words can change someone’s day.
5. Recognize freedom as a 5:30 a.m. trip to the diner with a bunch of strangers you’ve just met.
6. Try not to beat yourself up over having obtained a ‘useless’ Bachelor’s Degree. Debt is hell, and things didn’t pan out quite like you expected, but you did get to go to college, and having a degree isn’t the worst thing in the world to have. We will figure this mess out, I think, probably; the point is you’re not worth less just because there hasn’t been an immediate pay off for going to school. Be patient, work with what you have, and remember that a lot of us are in this together.
7. If you’re employed in any capacity, open a savings account. You never know when you might be unemployed or in desperate need of getting away for a few days. Even $10 a week is $520 more a year than you would’ve had otherwise.
8. Make a habit of going outside, enjoying the light, relearning your friends, forgetting the internet.
9. Go on a 4-day, brunch-fueled bender.
10. Start a relationship with your crush by telling them that you want them. Directly. Like, look them in the face and say it to them. Say, I want you. I want to be with you.
11. Learn to say ‘no’ — to yourself. Don’t keep wearing high heels if you hate them; don’t keep smoking if you’re disgusted by the way you smell the morning after; stop wasting entire days on your couch if you’re going to complain about missing the sun.
12. Take time to revisit the places that made you who you are: the apartment you grew up in, your middle school, your hometown. These places may or may not be here forever; you definitely won’t be.
13. Find a hobby that makes being alone feel lovely and empowering and like something to look forward to.
14. Think you know yourself until you meet someone better than you.
15. Forget who you are, what your priorities are, and how a person should be.
16. Identify your fears and instead of letting them dictate your every move, find and talk to people who have overcome them. Don’t settle for experiencing .000002% of what the world has to offer because you’re afraid of getting on a plane.
17. Make a habit of cleaning up and letting go. Just because it fit at one point doesn’t mean you need to keep it forever — whether ‘it’ is your favorite pair of pants or your ex.
18. Stop hating yourself.
19. Go out and watch that movie, read that book, listen to that band you already lied about watching, reading, listening to.
20. Take advantage of health insurance while you have it.
21. Make a habit of telling people how you feel, whether it means writing a gushing fan-girl email to someone whose work you love or telling your boss why you deserve a raise.
22. Date someone who says, “I love you” first.
23. Leave the country under the premise of “finding yourself.” This will be unsuccessful. Places do not change people. Instead, do a lot of solo drinking, read a lot of books, have sex in dirty hostels, and come home when you start to miss it.
24. Suck it up and buy a Macbook Pro.
25. Quit that job that’s making you miserable, end the relationship that makes you act like a lunatic, lose the friend whose sole purpose in life is making you feel like you’re perpetually on the verge of vomiting. You’re young, you’re resilient, there are other jobs and relationships and friends if you’re patient and open.

I didn't make these up, but I sure am going to try and complete them by next August!
Goodluck
xoxo,
-Lo

Monday, March 25, 2013

a quick SHOUTOUT


if you like rap or just wanna help a talented group out - click this link, listen & vote 5!
my brother and his friend's rap group "MIC HEIST" is number two on 97.1's "Who's Next" page.
Help make them number one!


Thursday, March 21, 2013

Furniture FOR SALE


I have several pieces of furniture and random home decor items for sale listed on Craigslist. Take a look and contact me via the Craigslist Ad if you're interested! Great pieces, some never even used as this home was a "part-time home" to the family. Prices are negotiable as stated in the ads, and all dimensions are also stated in the ads, if any questions contact me!

Thanks,
Lo


Wooden Wine Cooler Cabinet

Couch Set 1: (LoveSeat & Sofa)

Gorgeous Granite Foyer Table

Dining Room Set - 11 Pieces! - SOLD

Glass Coffee Table & Matching End Table

Marble Accented Sofa Table, Coffee Table, & Matching End Table

Set of 2: Cherub Planters - SOLD

Couch Set 2: (Paisley) (LoveSeat & Sofa)

TV & Stand

Marilyn Monroe & Audrey Hepburn Wall Art

Cherub/Angel Sculptures

Random Home Decor Items

Dark Wood Hutch

Lamps

6 Piece Bedroom Set - KING

Gorgeous Floral Centerpieces

Wooden Corner Hutch w. Glass Doors (Lights Work)

Wooden Coffee Table


Wednesday, March 20, 2013

DIY Easter How-to's & Ideas


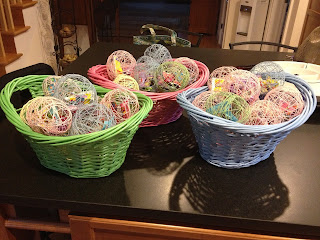
Since we host Easter Sunday at our house every year, I always try to add something with a little creative touch to the table or desserts. In past years I've mainly done cute cupcakes, such as bunnies or chicks. This year i decided on something that not only the kids would get a kick out of. This year I made "Netted Easter Egg Candy Treats." 


One netted egg gets placed at each table setting for Easter Sunday Dinner, such a cute and fun thing for everyone to wonder how the candy got in there and to get it out!!!

DIY How To:
WHAT YOU WILL NEED:
Water Balloons 
(any color, they get popped)

Cotton String
(you can used white and add food dye to the mix or use regular friendship bracelet string)

Liquid Starch
(I got mine at Walmart (Sta-flo) for 5 bucks!)

Flour

Mixed Variety of Candy


Step One:
I learned this the hard way so I'm going to teach you the easy way!
First thing you're going to do is blow up your balloons to the size you want, i blew mine up to a little smaller than the size of my hand. 


Step Two:
Next you're going to get a bowl or whatever you prefer, i actually used a half-tray catering foil tin!
Mix in 1 cup of liquid starch for every half-cup of flour, creating your mixture. Now if you purchased white string, you can now add in 3-4 drops to the shade you prefer, to the mixture and stir. I would do smaller amounts of the mixture so that none goes to waste and you get tons of colors! 

(This was the mixture without any food coloring, as you can see I used colored string, I will tell you though: *TIP* adding the food coloring definitely gave the finished product more of a bright color pop!)


Step Three: 
Don't let your string get tangled! If you lay the string in the bowl/tray in a circular pattern it shouldn't tangle, but its hard to say it definitely won't because the starch makes it get sticky. If it tangles, no big deal, cut and keep on going!

Step Four:
Now you're going to place the string on the balloon, i usually start by the knot to keep it neat looking, and place my finger to hold it, while my other hand wraps the string around and around and around and around and around to form the "netting" look. Place on parchment paper or a tray, and allow several hours to dry. You want the string to be HARD so the more starchy mixture you get on it the better, keep that in mind!


Step Five:
When the string has completely hardened, (I let mine go overnight so i knew for sure) you're then going to take a sharp object, i used a knife, and pop the balloons right through the string openings, remove the deflated balloon, and toss it. Place each net to the side.

Step Six:
You're almost done!
Find the biggest opening in the net and shove some candy in there gently. If there is no opening big enough, simply take scissors and cut a string to create an opening! 
In each "net egg" of mine, I did a treat size bag of mini m&m's or skittles, 2 mini kit-kat's, 1 mini snickers, and 2 mini reese's eggs, and that to me is the perfect amount of sweet on Easter. 


PS. these baskets were 5 dollars at Walmart!
Enjoy! :)
XOXO
-Lo


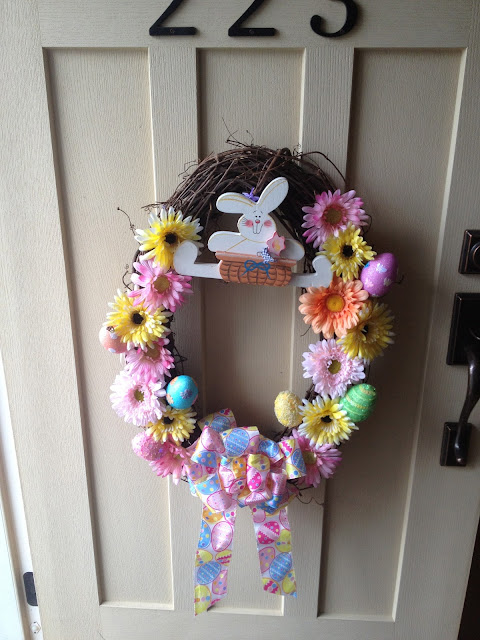
DIY Easter Wreath How-To:


WHAT YOU WILL NEED:
Twig Wreath
(Michael's: $2.50)

Easter Eggs
(I got mine at a local dollar store 2 for $1.00, they come on wooden sticks)

Ribbon

Faux Flowers
(Michael's or a Dollar Store)

Optional: Wooden Bunny 
(I found my little guy at a thrift shop for $1.69, you can use pretty much anything, an old decoration even, or something from a dollar store, be crafty!)

Step One:
Pull flowers off of each stem, and also take any loose pieces of twig or ones poking out the wrong way and break them off the wreath. Next you're going to layout your flower pattern in the places along the wreathe you're going to glue them. Once you've decided, heat up your hot glue gun. Using the hot glue gun, apply a drop or two of glue to the back of the flower as well as to the spot of the twig wreath where the flower will go, place and hold for a few seconds.  Repeat this for each flower, remember to keep in mind where you're going to place the decorative eggs! 

Step Two:
Using the same method with the glue gun, after removing the wooden stick from the eggs, glue each egg in the preferred spot. 

Step three:
Purchase either an already made bow if you're not feel to artistically talented, if you are and know how to make a bow - you're awesome, if you don't follow this YouTube Video I used, 

Step Four:
Attach a 3M Command Strip and Hook, to your front door or back door or wherever you may want to hang your wreath, and wait for the compliments, and you'll be able to brag and say you made it yourself. The glory of a DIY!


UP NEXT:
A traditional treat, that EVERYONE loves, with a little Easter twist on it!
Stay Tuned...


HAPPY EASTER!
XOXO,
-Lo


Wednesday, March 6, 2013

Junk Gypsy's DIY Bridal Shower Tips

COMING SOON - JUNE 2013 - BRIDAL SHOWER DIY TIPS
"Lovebirds Theme"

It's been a while since I last posted - but it's been a busy busy busy month helping plan a Bridal Shower and being part of a wedding this August 2013. Come back and check this post out in June of 2013 for Tips on how to DIY a Bridal Shower.
  • Create your own Advice Cards
  • Table Numbers
  • Create your own Invitations
  • How to use everyday things and not-so-everyday things for your shower
  • FREE "LoveBirds Theme" PRINTABLES & more!


Wednesday, February 6, 2013

Over-sized/Over-studded: DIY How-to Guide on Studding

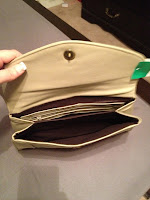
"The newest accessory to overcome the fashion world is having a big impact." Over-sized clutches have become a huge statement and valuable additions to making outfits work. In this post you'll see a thrift store find - transformed into a beauty for a night out.


The original bag, which i found at Unique Thrift Shop, was priced at $4.99 and I just so happened to be thrift-shopping on a 50% off sale day! To find bags that have potential - you need to know what you're looking for - any leather bag/clutch with no name brand posted on the outside at all is KEY. Be open to all different colors and shapes, you never know how you may change its look for the better!
This blogger actually changes the color of her clutch and then studs it:

As for mine, I already loved the vintage-like look it had, so I thought adding a few studs would be key.


Using an x-acto knife i cut the tiniest slit into the spot where was going to attach the stud. (*TIP: I eye-balled the spacing, but you could measure it out and put little marks where each stud is to be placed.) 


Once you place the stud where you want it - you then use a butter knife or hammer to gently push the prongs down and secure the stud in place.
I got my studs off of Amazon. They were pretty cheap - but sold in bulk. 
Search for: Nailhead Studs
(they come in all sorts of shapes and sizes!)


The finished product, ready for a night out! 


Happy Studding!
xoxo,
-Lo


More pictures of the process...


Monday, February 4, 2013

Think outside the Box. Distressed Wooden Mail Sorter DIY

THINK OUTSIDE THE BOX - DISTRESSED WOODEN MAIL SORTER


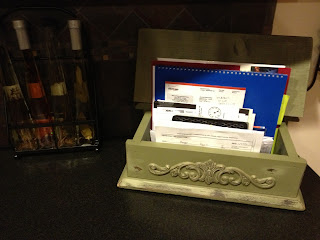
This is my favorite thrift find so far…here is how I repurposed a wooden old beat up box to a fancy-looking mail sorter/holder.

Original Box:


WHAT YOU WILL NEED:


Wooden Box (Thrift Store Find)
Pledge
Wooden Appliqué from Hobby Lobby
Gorilla Wood Glue
Foam Brush
Spray Paint
Sand Paper

First thing I did was clean the entire box free of anything sticky, dust, dirt and germs.
Next, I painted Gorilla Wood Glue on the back of the Wooden Appliqué using the foam brush.

Next I lined the Appliqué up in the center of where I wanted to place it, and put it down.

To ensure that your appliqué stays in place and adheres well, you want to put something heavy on top of it, like so:
After about an hour your appliqué should be secured, and you can begin spray painting.

I used Rustoleum's "Leafy Green" Satin Spray Paint.
Completely covering all sides and the appliqué, allow the paint to dry over 2 hours.
Using 120 or 220 Grit Sanding Paper, begin to rub lightly all over every edge, corner, and especially the appliqué, creating the "distressed" look.

Once done with the distressing, add some hinges to it.


You can use the box for whatever you think of - mine is to hold that weeks mail. and the best part is you can simply shut the lid and hide all the mail if your expecting company and want it to look tidy! :)

So next time you're at a garage sale, thrift store, or even your own garage/basement keep an eye out for those wooden boxes and be sure not to throw them out, instead THINK OUTSIDE THE BOX!
xoxo
-Lo